
Craft Napa - January 2021
Uncorked at Home
Coaster/ Mug Rug Kit

I have always enjoyed creating a little something special for the
swag bags which, in past years, each attendee received as they
arrived in Napa for Pokey Bolton's annual retreat.
This year, we pivot.
The event will be virtual, I will teach my classes on zoom,
and we will all tune in from the comfort of our home studios.
This year, attendees who have enrolled in three
or more classes will receive the Swag Bag.

A knee-deep pile of 150 coaster kits.
I pondered what would be an appropriate gift this year.
One of the retreat events is an evening wine tasting party.
Those who have signed up will receive a selection of bottles by mail
and a sommelier will guide the group through a special tasting.
So......I designed a limited addition Craft Napa Coaster/Mug Rug kit
for my contribution to the swag bags. Attendees can make a coaster
for use during the wine tasting evening and throughout the retreat.
Coffee in the morning, afternoon tea,
and wine, wine, wine!
++++
The kits contain a selection of my hand-painted fabrics, Mistyfuse,
cotton canvas, parchment paper, basic instructions,
and a pre-fused Craft Napa label.

Each kit has a piece of either red or blue fabric plus two green tones.


I painted for my classes and for these coaster kits.
I began with commercially printed fabrics and added layers
of acrylic paints to create texture and highlights.
I often times start with commercially printed fabric
with subtle imagery.

This blue fabric began as commercially printed light blue with
white dots. I first dipped the entire yardage in a bucket of diluted
teal paint then draped it over my lawn to dry. Second and third layers
of paint, added by brush, add lots of big circles.
Notice the backside of the fabric where the layers of paint seeped
through.I like to use both sides of the fabric depending on the
intensity of color I desire.

This fabric was originally light red, printed with
a darker dotted peace sign motif. Layers of my paint obscure the
printed design and offer areas with high contrast and shading.

This fabric began as a white-on-white quilting cotton.
From a few feet away, the fabric looked completely white but
upon close inspection a motif of white dragonflies could be seen.
By adding layers of diluted paint, the dragonflies emerged. The
original white printed design acted as a 'resist' to the new washes
of acrylic paint. Then I deliberately covered up parts of the image
with thicker paint layers to make the motif less prominent.
The photo below shows the front and back of these two different
red-toned fabrics. The option of using the front or back of the fabric
offers a wide variety of hues and color intensities to choose from.

Coaster Kit Directions:
Choose a design from the patterns provided in the kit or,
better yet, design your own.

Cut out the desired paper pattern pieces.

Determine the size of your coaster. Mine measures 5" square.
Cut two pieces of canvas.

The canvas I use is from Home Depot!
It's a drop cloth from the paint department. My favorite!
I've used this fabric for years for loads of different projects.

If, by chance, your canvas is slightly 'off-square'
(meaning that the vertical or horizontal threads are not
perpendicular to each other) you can easily tug the opposite
corners to square it up. In the photo below, I intentionally
pulled the canvas 'off-square' to illustrate this distortion.
I can make it square again by pulling the
opposite corners to adjust it. Iron if necessary.

Planning your design
This next step is just the planning of where you will later cut
your fabric. Choose areas of the painted fabrics you'd like to
use for your design.

Do not cut your painted fabric yet.
It is recommended that you iron Mistyfuse to the fabric
before cutting out the fabric pieces. This way,
the fusible will be neatly trimmed right up to the
edges of your fabric pieces.
Remember, you can use either the front or the back of the fabrics.
You might choose to use some areas of both sides of the fabrics.
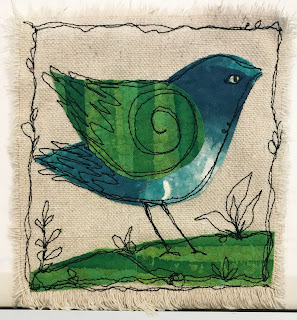
In the photo below, I used the back side of the red fabric for the
bird's body and used the front, heavily painted area, for the
wing. If you are planning to use parts of both the front and
back of the fabric, you will need to cut your fabric apart
strategically so that you can add fuse to the back side of
each chosen part.


Here are some more possible ways to strategically
cut the fabric. Notice how I used one small orange patch
for the bird's beak. And each flower petal was
cut out separately.
Or..... Make up your own design!


can layer and combine a few scraps together. Notice how
I made the flower pot with two different scraps.
But don't cut out your shaped fabric pieces yet!
You will add fuse to the fabric BEFORE
cutting out your pattern.
Note: If the fabrics seem stiff, you can scrunch them up
in your hand and roll them around a bit. This will break up
some of the more heavily painted areas and result in
a softer feel.
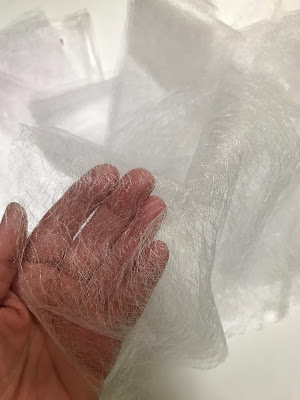
The Magic of Mistyfuse

Misty Fuse is an environmentally friendly fusible that is solvent-free
and recyclable. It's been extruded to a very fine web to create a
lasting bond without adding bulk. No extra adhesive to gum up
your needles. It is suitable for a wide variety of fabrics from velvets
and cottons to delicate tulles and silk organzas. The fusible is made
from 100% thermoplastic adhesive polymer resin. Misty Fuse is a
dream to work with - it
handles well, is sheer and doesn't add bulk to your fused
fabric and bonds firmly once cooled.
Important!
You must use parchment paper
(or a teflon-coated, non-stick ironing sheet)
both under and on top of the project to protect
your iron and your ironing board.
Pictured below are Reynold's brand Kitchen Parchment Paper
and 'Goddess Sheets', made by Mistyfuse. The Goddess Sheet
is made from Teflon-coated, sheer fiberglass - creating a
long lasting, nonstick sheet. If using parchment paper,
PLEASE use Reynolds brand!Some store brands are
problematic and can stick to the fusible.
(Lesson Learned!)

The Process:
Cut the parchment paper from your kit in half and
put one piece on your ironing board.
Lay your chosen painted fabric on top of the parchment
with the wrong side facing up.
Cut a piece of fusible to roughly the same size as your fabric.
It is helpful if it is slightly smaller than the fabric
but large enough for the pattern piece.
Lay the Mistyfuse on top of the fabric.
Cover with the other half of parchment paper.
Any fusible that is exposed will stick to your iron
so be sure it is fully covered.
Use the cotton setting on your iron.
Simply iron the fabric (without steam).
NOW.....
it's time to cut out your fabric pieces
by pinning the paper patterns to your fabric
or just winging it and cutting some shapes.
Arrange the pieces on your top square of canvas,
with parchment paper
on top of and below the project.
Iron to fuse the shapes to the background.

Iron the pre-fused label to the back side of the bottom
piece of canvas.
(Remember that Parchment Paper!)

Add stitching!
I like to add free-motion stitching with black thread.
I usually stitch around the edge of each fabric piece
and then add more details.

After you have added all of your stitching to the central design,
layer your two canvas pieces together with wrong sides together.
Stitch around the perimeter.


Optional: I opted to add a layer of Liquitex Matte Medium to one
of my coasters to act as a water-resistant barrier. It might
help keep my coaster from getting coffee drip stains.
The jury is still out.
I'll let you know what I think of this option.

Brew that Coffee,
Steep that Tea,
or Pop the Cork!
Cheers!
A huge Thank You to my friend Iris Karp
for donating the Mistyfuse for this project.
Please visit her website for
more products and information.
Mistyfuse.com

Here we are, a few years back, in Houston
in the Mistyfuse booth at the International Quilt Festival.
Judy Tucker, Lisa Chin, Michelle Banton, me,
and Iris Karp of Mistyfuse

